Sunday, April 11, 2010

Canon EF 70-200mm f/4.0 L IS USM Lens


After a long wait I've made a bold decision to purchase a professional category lens - Canon EF 70-200mm f/4.0 L IS USM Lens. With no time I fell in love with this amazing lens. I was completely satisfied with its result and was glad to make this decision.
For the first time I realised the quality of L category lens. If my budget permits I shall never buy any lens other than L category.

Canon EF 70-200mm f/4 IS USMBharatanatyam DancerDragon HeadCanon EF 70-200mm f/4 IS USM

The color and contrast of images taken from this lens were unbelievable. I could find a distinguished quality in image when compared with my previous lens, making this as the default lens to use for some time.


Friday, May 1, 2009

Ultra Wide Angle Lens


After watching a lot of marvelous shoots taken using Ultra-wide lens, my liking to own one such gear kept increasing. I had a chance to use one such lens from my friend Prashanth. Then onwards I started collecting all possible comparisons (price versus performance). Ken Rockwell is one brilliant photographer and his website is filled with abundence of information that any photography enthusiast & beginner must read. I could able to collect a lot of information from his website. He has provided valuable information related to Ultra Wide Photography and comparison of Ultra-Wide lenses. Rajesh is another brilliant photographer I found in Flickr with a lot of beautiful Wide-angle shoots that inspired me. It is worth visiting his PhotoStream in Flickr.
Finally I bought Sigma 10-20 F/4-5.6 EX DC HSM Ultra-Wide lens.
Wide Angle View
View this link to find 17 Stunning Wide Angle Images
These are some of my first few shots using Sigma 10-20 Lens.
Wide Angle ViewClick to visit my Flickr PhotoStream
Click to visit my Flickr PhotoStream
Click to visit my Flickr PhotoStreamClick to visit my Flickr PhotoStream


Friday, April 17, 2009

Reverse Lens Technique


After reading a lot about Reverse-Lens technique, I decided to attempt one such shot. Reverse-Lens method is been popularly known as poor-men's Macro. All we need to do is pick our kit-lens (18-55 mm lens) and fix it in reverse direction to the body of camera and start experimenting. At the same time, it is not that easy as mentioned here. It is advisable to do little bit of reading related to reverse-lens techniques from Internet and there are plenty of details available. Note down the precautions needed before venturing with this technique.
Most of the sites advice to use Reverse Mount Adapter that enable lens to fix in reverse order on the body.
To start with, switch off Auto-Focus and Image-Stabiliser on the Lens. Make sure that the protruding end of the lens sits firmly with its body. Since auto-focus and Zoom does not work, one need to move forward or backward to get the optimum sharpness of the subject and click. ISO, Shutter-speed and aperture can be adjusted to get the proper result.
One need a lot of patience to work with this technique.
Some useful links to know more about Reverse-Lens:
Tutorial in Flickr
Reverse Lens Macro Photography Tutorial by Stephen Elliot
PhotoTakers.com
DLusion.deviantart.com
CresTock.com
RichardFlake.com
These are some of my results....
Macro -  Reverse-Lens-TechniqueMacroMargosa / NeemTime to go....
Have Fun!!!!

Friday, February 6, 2009

Light Painting


Light painting is a photographic technique in which camera kept in a dark room (most often) with the settings for long exposure and move the hand-held light source or camera that creates an optical illusion. In many cases the light source itself does not have to appear in the image.

I first came across such image in a PhotoStream of Abhijith. Recently I came across a wonderful artist who is a real professional in Calligraphy and Light-Writing. He is Julien Breton and it is worth visiting his PhotoStream in Flickr.

This is a hundred year old technique used by Pablo Picasso and in recent time its popularity increased due to some of the recent advertisements.

After watching a few such PhotoStreams in Flickr, especially the work by Julien, I fet myself to attempt for such experiment. My attempt was to assess myself the talent and technique required for such a wonderful art. These are my results and can easily conclude that it is not an easy task to master in this art. This made me to admire the work of those talented artists.
Light Writing....
Light Writing....
Light Writing....
wIMG_9653
wIMG_9612

Read more about Light-Painting and Light-Writingin Wikipedia.
Tutorial: Video
Another interesting article about How to Paint with LIGHT

I was delighted to view my work as one of the 15 Amazing Light Graffitti pictures in a site named Soft@Lize.

Monday, December 15, 2008

Drisyam 2008 (Photo Exhibition 26th - 29th Dec 2008 at Ernakulam Town Hall, Kochi, Kerala )


, is a group in Flickr that comprises photography enthusiasts Keralaits residing within Kerala and abroad. The group includes Amateur as well as Professional Photographers from different walks of life, having a common passion towards Photography.

A few brilliant members including JP, Sanju and few more conceived this Endeavour “Drisyam 2008” - A photography exhibition wherein members can showcase their photographs for the public.

End of an elaborate discussion, various members came forward to take up the various responsibilities and that gave way to this wonderful effort.


Each member had an opportunity to submit five photos from which the selected members did the job of screening. The selection of photos must have been a tough job for these members. My submission of five photos to Drisyam 2008 and this was selected ....

Drishyam 2008
Venue: Ernakulam Durbar Hall Art Gallery, Kerala Lalitha Kala Academy Kochi, Kerala, India
Date : 26th - 29th Dec 2008
View Abhijith's photo stream Courtesy: abhijith. It it the moment of great joy to see my photo in an exhibition. My profound thanks to KeralaClick team for providing me such an opportunity to participate in this great event.
KeralaClicks Blog

Saturday, November 15, 2008

Experment on Depth of Field


In simple term, Depth of Field can be described as the area or 'zone' of a photograph that is in focus. The decrease in sharpness is gradual on either side of the focused area in the photograph.
old toy Car
Dept of Field is not fixed. There are three main factors that determines its extent. First is the lens aperture - the samller the aperture, the greater the depth of field. Hence, a wide aperture (eg:-f2) will have an inherently shallow depth of field than a small aperture (eg:- f6).
The Second factor affecting Depth of Field is the lens focal length. Wide angle lens produce an inherently greater Depth of Field than normal or telephoto lenses.
The Third factor affecting Depth of Field is the focus distance of the subject.The further away you focus the lens from the camera the greater the resulting depth of field. Therefore, a lens focused at 1m from the camera will produce a shallower depth of field than the same lens, set at the same aperture, focused at just 3m from the camera.
View my Depth of Field photos in Flickr

Exposure: 0.001 sec (1/1250)
Aperture: f/3.5
Focal Length: 18 mm
ISO Speed: 100
Exposure Bias: -1 EV
YCbCr Positioning: Centered
Exposure Program: Aperture priority
Shutter Speed: 679936/65536
White Balance: Manual

Wednesday, October 1, 2008

My Second Lens


After a long wait, I've cautiously purchased my second lens - CANON EF-S 55-250 IS. I've spent a lot of time reading different articles, spent time discussing with a few friends about the pros and cons about different lens. I felt very difficult to decide if I can go with SIGMA or TAMRON or TOCINA or CANON. Different persons had different reason to justify their views.
Ultimately, I made a firm decision to go with CANON alone, and then starts my next dilemma - which lens to start with? Fixed Focus Lens , Tele, USM lens etc. Initially I felt to go with IF (Internal Focus) Lens and my eyes were locked on 70-200mm F/4.0 L USM. All reviews lead me to this lens as the preferred second lens and that made me to dream for it. Even though it was a bit heavy to my valet, I was almost sure to go with it. To make my valet comfortable, I even decided to sacrifise IS (Image Stabilizer)feature. Unfortunately, I had some personal reason due to which I have to shell out some of my extra money for unexpected reasons and that made me to look out for a less expensive lens.

My second option was always for EF-S 55-250mm IS lens. I started consoling myself as - for a beginner, there is no other lens better than this. The reasons to opt this lens - Less weight, relatively good fast AutoFocus, Less expensive & finally a few good review about this lens.
Click here to visit my Flickr Photo Stream
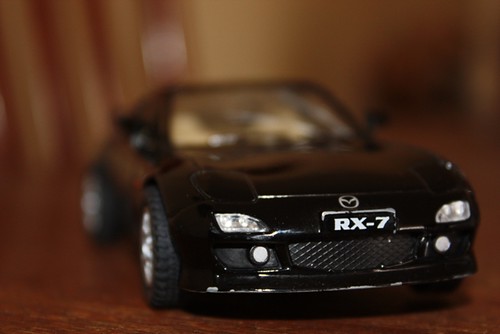
As expected, I could able to find good results from this lens.